The Hatch button allows drawing a hatch or a fill.
Quick Access Panel: ![]()
Ribbon: Editor -> Draw -> Hatch
Menu: Draw -> Hatch
An area in the drawing can have a hatch or a fill. Fills can be solid and gradient. A single command is used for them in ABViewer. The command Hatch calls the Boundary Hatch and Gradient dialog box.
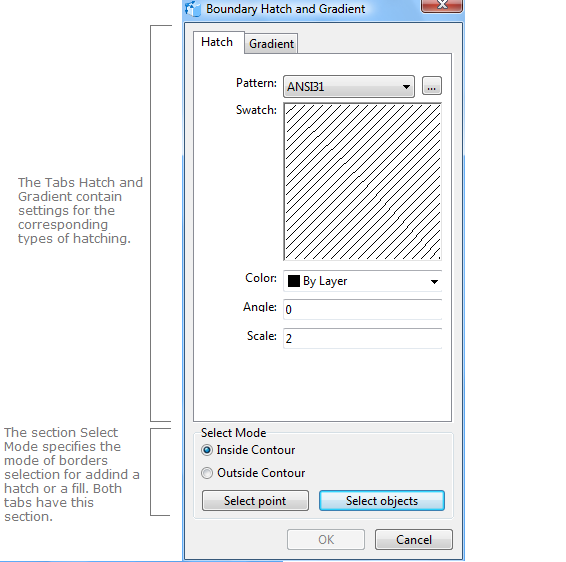
The user selects the needed tab which contains a set of parameters according to the added type of hatch. The borders are defined by the options Inside Contour and Outside Contour combined with the command Select point or an object is selected which will contain hatch. To add a fill make use of the tab Hatch.
The Hatch Tab
This Tab allows to add a simple hatch and a solid fill. Hatch name is selected from the Pattern drop down list or a hatch is chosen from the collection of hatches which is activated by pressing the Browse button ![]() on the right of the drop down list. The graphical image of the chosen hatch is displayed in the preview area.
on the right of the drop down list. The graphical image of the chosen hatch is displayed in the preview area.
Before adding a hatch you can set the values of some of its properties. All the changes in these parameters will be viewed in the preview area.
•Color. Sets the color of the hatch lines. The default value is By Layer.
•Angle. Defines the inclination angle of the lines in the drawing.
•Scale. Sets the scale of the hatch lines. The scale sets the frequency of repeating the hatch lines in the drawing. The higher the scale is the bigger the number of fragments per drawing unit is.
Note: To add a solid flat fill select the template with the name "SOLID".
Gradient Tab
A gradient is a hatch gradually changing from one color to another. It can consist of one color with the transition from darker to lighter shades, or of two colors.
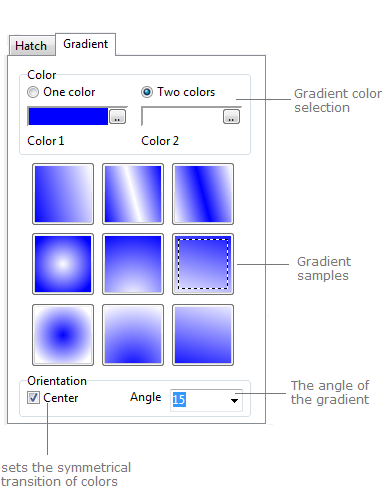
In the Color Section the number of colors and their values are specified. If one color is used then the gradient will contain a smooth transition from darker to lighter shades. Switching on the option Two colors allows to add a gradient with a smooth transition from one color to another one.
The tab has nine samples of gradient that also perform preview function, as they change in accordance with the parameters selected. The section of a sample is fulfilled with the left mouse button.
The section Orientation defines the angle and the direction of the gradient. The option Center stands for symmetrical transition of colors. If the option is off you'll get an illusion of a light source.
Setting the Boundaries of Hatch and Gradient
Boundaries of the gradient can only be specified by geometrical entities: line, polyline, circle, ellipse, spline. The contour for the boundaries definition can be specified in different ways:
1)automatically: a point inside or outside the object is specified;
2)by selecting an object: objects cam be selected before or after activating the command Hatch.
To select an object use the commands [Select point] or [Select objects] of the dialog box Boundary hatch and Gradient. The Options Inside Contour and Outside Contour are used in combination with the command Select point and define where a mouse click will take place - inside or outside the object. The command Select objects switches the program to the mode of selecting the objects the shared area of which will contain a hatch. To finish the selection and return to the dialog box Boundary hatch and Gradient press Enter.

To define the borders of the hatch you can use an open object. In such a case it is impossible to define the borders with the help of a point. The command [Select objects] is required. For example,
 Before |

After
Editing Hatch and Gradient
A hatch has a set of properties which can be viewed and edited. Some parameters can be changed in the Properties panel, some others - only in the dialog box Boundary hatch and Gradient, which is called with the help of a double mouse click over the created hatch. The contour of the hatch can't be changed. It can be moved, copied etc.
Hatch properties:
Property |
Description |
|---|---|
Color |
Defines the color of the lines of the hatch and solid fill. |
Layer |
Defines the layer which the hatch belongs to. The property contains a list of all available in the drawing layers and allows to move the hatch to another layer. |
Line Weight |
Defines the lineweight of the hatch. It is selected from the standard values. You can turn the function of showing the lines according to their lineweight on or off. Each lineweight value corresponds to a number of pixels on the screen. The number of these pixels isn't changed while scaling in the program window. The scale of lineweighht display on the screen is set in the Visualization tab of the Options window. |
Name |
Is the name of the sample of the used hatch. To change it call the dialog box Boundary hatch and Gradient. |
Angle |
Is the angle of rotation of the hatch in the XY plane. |
Scale |
Sets the rate of hatch lines. The higher the scale is the lower the frequency of the hatch lines is. |
Gradient properties:
Property |
Description |
|---|---|
Color |
Defines the color of the lines of the hatch and solid fill. |
Layer |
Defines the layer which the gradient belongs to. The property contains a list of all available in the drawing layers and allows to move the gradient to another layer. |
Name |
Is the name of the used hatch. For gradient it is always GRADIENT. |
Angle |
Is the angle of rotation of the gradient in the XY plane. |
Color 1 |
Is the value of the color 1 of the gradient. |
Color 2 |
Is the value of the color 2 of the gradient. |
The order of the hatch can be changed with the help of the commands of the dialog box Bring to front and Send to back.
Go to ABViewer